
Authority Soccer (authoritysoccer.com) is a participant in the Amazon Services LLC Associates Program, an affiliate advertising program designed to provide a means for sites to earn advertising fees by advertising and linking to Amazon.com. This site also participates in other affiliate programs and is compensated for referring traffic and business to them.
There’s no feeling that matches putting on a new pair of soccer cleats and running out to the field for the first time. However, after a few outings, as they get dirtier, the magic seems to disappear.
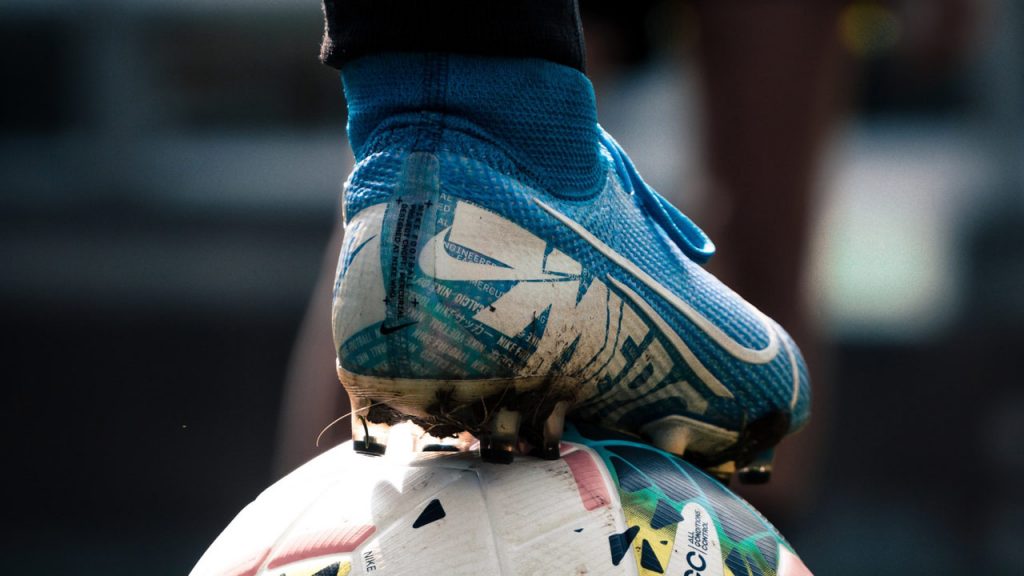
If you opted for a set of white cleats, the magic can be there for just the first few minutes before you get them dirty enough to become unrecognizable.
This leads to a logical issue that every soccer player needs to know the answer to, how do you clean soccer cleats?
Remove any dirt, grass, and mud by knocking the cleats one against the other. Using a washcloth, follow with a mixture of water and laundry detergent that you can apply to the outer layer of the cleats with any potential stains.
Rinse with the washcloth dipped in clean, warm water. Make sure to do this after every game and practice.
This simple cleaning method can be used for soccer, football, lacrosse, and baseball cleats.
The method listed above is what every player that uses cleats for games and practices needs to do on a regular if he wants his/her cleats to last longer and remain looking brand new. In some conditions, or with months of neglect, cleats can get so much dirt on them that this simple regular maintenance method can’t help much.
The rest of this article is dedicated to advanced soccer cleats cleaning methods, so scroll on to find out more!
How to clean soccer cleats
Even though we went through the basic principles of keeping one’s soccer cleats clean, the proper process of keeping them looking shiny and new, as well as ensuring longevity, is much more complex.
Here are the steps to follow if you want your soccer cleats to last longer:
Step 1: Cleaning preparation
Proper soccer cleats care, for both new and old shoes, starts before they’re even on the field for the first time. Every soccer player should make a habit of keeping an object suitable for dirt removal from shoe studs in their soccer bag.
This can be a putty knife, a popsicle, or even a multitool that has a screwdriver or a similar sharp-ish object. Just make sure that the object you bring in your bag is allowed in the locker room and that it isn’t dangerous or likely to cause an injury.
As knocking the shoes against each other can’t always be effective, the bottom of the cleats should be cleaned from mud, dirt, and grass using the aforementioned tools after each practice or game.
In addition to the dirt removal tool, players should also bring a washcloth or a towel, and even an old toothbrush can come in handy.
Another important thing to keep in mind is not to wear cleats off the field, as they are not meant for hard surfaces. Wearing them on concrete or similar floors can lead to excessive wear and tear.
Step 2: Regular maintenance cleaning
Getting your soccer or football cleats dirty is inevitable. This is why we come prepared.
Remember that a little bit of maintenance after each use can save you hours of cleaning in the long run, as well as extend the lifetime of your sports shoes. Here’s what we do after the practice of the game is finished:
First, the cleats should be rid of any muck that has accumulated. If the banging them around method doesn’t work, the tool we packed in our soccer bag comes into play.
Using the tool, remove as much of the accumulated dirt as possible. If there’s a sink you can use, slightly dampen the washcloth or the towel you brought and wipe the cleats clean.
If not, a dry run with the fabrics must do for now. Use the toothbrush for spots that are hard to reach. If the mud on the soccer cleats is still wet, leave it to dry and skip this step.
To avoid making a mess, dirty cleats should be placed into a plastic bag which then goes into your soccer or shoe bag.
Step 3: Deep cleaning your soccer cleats
This step of cleaning the soccer cleats applies to shoes that are dirtier than normal. In case your soccer cleats are clean after the minimal maintenance we went through in the previous step, this step is not necessary after each use. Just go by feel.
The thorough cleaning of soccer cleats can begin once the practice of the game is finished and the player has made it to their home.
There, they can dismantle the shoes by taking out the insole, if it’s detachable, as well as the laces. These can be washed with soap and water. The player can then proceed to clean the actual shoes.
First, we clean the uppers. By damping a washcloth in a mixture of lukewarm water and a little bit of laundry detergent, dish soap, or hand soap, each shoe should be thoroughly wiped.
With the laces out of the way, every nook and cranny should be accessible. Once done with this part of the process, the washcloth should be rinsed and any excess soap should be removed.
Using a dry towel, the shoes now need to be dried thoroughly. It’s important to note that the uppers don’t like too much water and can get damaged.
Make sure that no water reaches the inside of the shoe. If it does, let the shoes air-dry overnight. Avoid using a direct source of heat such as a hairdryer, as it can damage the cleats’ structure.
The soles of the soccer cleats should be clean enough after the second step. If the mud was still wet before you brought them home, now’s the time to refer to that step. Once done, you can reuse the damp and soapy washcloth to clean the bottoms of your soccer shoes.
Once everything, including the laces and the insole, has air dried, the cleats can be reassembled. They should be as good as new and ready for the next use.
Can you wash soccer cleats?
According to Adidas, soccer cleats should not be washed in a washing machine, nor should they be put in a drier. A light wipe with a damp towel should be more than enough to keep the cleats clean.
Top-end manufacturers design their cleats to be able to withstand any conditions that the field can throw at them, and by going through the previously listed steps, your soccer cleats should stay as good as new for a long time.
Even though the listed steps only take care of the outside of the soccer cleats, the inside shouldn’t worry you; it’s designed to get wet on the field.
This absolutely doesn’t mean that it can handle a washing machine. If the shoes get wet on the inside, just allow them to air-dry overnight.
The removable insoles can be washed and air-dried, as mentioned above. Soaking your soccer cleats in a mixture of water and laundry detergent is also not recommended, but it is always a better option than running them through the washer.
Before proceeding, let’s reiterate that machine washing is not recommendable for soccer cleats as it can negatively affect their structure.
However, if you have an older pair of cleats that are in desperate need of a cleaning, and the cleaning steps we already mentioned aren’t helping, here’s what you can do:
Make sure that the washing machine is set to speed wash, as you don’t want your soccer cleats to spend too much time in the water.
The temperature should be set to cold, as the warmer water can dissolve the glue that holds the shoe together. If your washer has a soil level adjustment, feel free to select the one that suits the level of dirt on your cleats.
Let’s face it if you’ve resolved to use a washer this setting should be set to heavy.
The spin speed setting should be set to medium. Never start the wash with just the cleats in the machine, add at least one towel to the mix, as it can dampen the impacts that the shoes take throughout the cycle.
A small amount of laundry detergent should also be added to the washing machine.
After breaking the rule for using a washing machine to clean your soiled soccer cleats, make sure that you leave them to air-dry. Avoid putting them in a drier at all costs.
How do you wash soccer cleats with socks?
Soccer cleats that come with an integrated sock section for ankle support might seem insanely challenging to clean, but the basis of cleat cleaning remains the same:
The actual studs should be rid of any dirt after every use.
This task is done in the same way as with regular soccer cleats, either by knocking the soles of the two shoes against each other or by scraping with a sharp object or a brush, depending on the hardness of the dirt.
When you get the soccer cleats with socks home, you can bring them to a sink and start the more thorough cleaning:
First, using a washcloth, a soft-bristle brush, or a sponge, clean the outside of the cleats starting from the top. Modern cleats are designed to handle water, so don’t be afraid to let the water from the sink run on the outside of the shoe.
Add some dish soap, laundry detergent, or regular hand soap to clean the more persistent stains. The actual sock part of the shoe can be cleaned using the same method, or you can use a fabric stain remover.
Once again, keep in mind that putting the soccer cleats in a drier is not an option; they need to be air-dried. Also, note that the brighter colored soccer cleat socks can be extremely hard to restore to their original condition.
Regular light maintenance might help with this, but sometimes we just have to accept the fact that they can’t be new forever.
How do you clean smelly soccer cleats?
Moisture and heat are what create the perfect storm for bacterial growth. There are plenty of both of these elements in soccer cleats, coming from the players’ body heat and sweat.
The slowly developing bacteria is what causes soccer cleats, or any other shoes, to smell bad.
Sometimes, cleaning isn’t necessary to get rid of the smell. Leaving the shoes to dry after each use can drastically reduce the smell. Placing a piece of dry newspaper or paper towels is known to help as the paper absorbs moisture and speeds up the drying process.
Another commonly suggested method of removing odors from shoes and soccer cleats, especially for more persistent smells, is placing a few tea bags in the shoe and living it overnight. A fabric softener sheet can also be helpful.
If the smell in the cleats is still there after attempting all of these odor hacks, see if the insole is removable. The ones that are can be washed by hand, using standard laundry detergent.
The ones that can’t be removed from the soccer cleat are trickier to deal with, and there are no right choices among the available options:
Step 1: Light soaking
If the smell can’t be eliminated or reduced, soaking the soccer cleats in a mixture of warm water and mild detergent for 30 minutes should help.
After the soaking, the inside of each shoe needs to be scrubbed, then the cleats should be rinsed with clean water. Air-drying is mandatory. Newspapers or paper towels might come in handy to speed up the drying process.
Step 2: Risky machine washing
The second option is to take the risk of running the soccer cleats through the washer.
Considering that the shoes are likely to never be the same after going through the washing machine, maybe sticking with option 1 is a better choice.
Step 3: Giving up and ordering a new set of soccer cleats
This one may be the best among the options available; go online and order a new pair of soccer cleats.
Your budget might be affected, but at least the noses of your teammates in the locker room will be happy.
There’s one thing that players can do that voids them of all worrying about their soccer cleats smelling bad: Taking proper care of them before it’s too late.
How do I stop my cleats from smelling?
Proper soccer cleats maintenance doesn’t only include the cleaning of the outside of the shoes. Once in a while, the inside needs to be taken care of as well.
Removable insoles are easy enough to clean, but that should be done no more than once a month. Here’s what you should do to prevent your new soccer cleats from smelling:
After every use, the cleats need to be dried. Make sure that they aren’t left in your soccer bag overnight; get them out as soon as you’re home, clean the outside, and leave the shoes to air-dry.
This will prevent bacterial growth, therefore preventing any odor from appearing.
Even if you believe that your feet don’t sweat, follow the previous rule as well as this one: Invest in a deodorizing spray.
Regardless of hygiene, just like our armpits, our feet can need some help in order to remain odor-free. A deodorizing spray designed for this purpose can be found in most sporting goods stores.
Powders are also available for those who are not fans of potentially harmful materials found in sprays.
How do you make white cleats white again?
Most soccer or football cleats can remain looking brand new for years with proper and regular maintenance. This, however, doesn’t apply to white cleats.
This color is especially challenging to preserve and keep looking good through dozens of uses. Here are some tips on how to keep your white cleats white, and how to restore the ones that have faded:
Just like with any other cleats, clean your white ones as soon as you’re done using them. There’s one difference; the mud on white cleats shouldn’t be left to dry as it can easily discolor them.
If there’s a sink or a hose at the venue, make sure you use it to clean the mud off. While caution is recommended, don’t be afraid of the inside getting too damp; they can always dry.
For dried mud, a soft bristle brush, a washcloth, a towel, and some dish soap are your best friends. Scrub lightly until the white cleats are free of the mud.
As you brush, dirt will be released from the upper material, so make sure to have another piece of fabric around for removal. This is not as important as darker colors.
Older, leather cleats that have lost their color can be lightly brushed with a mixture of warm water and baking soda. Just don’t get too aggressive with the brushing. Once again, the surface will need to be wiped clean with another towel.
We all know what amount of joy playing in fresh, new cleats can bring. Unfortunately, most of us are not endorsed by Nike or Adidas, and we cannot afford a brand-new set of soccer cleats every time we hit the field.
Following the simple advice for proper maintenance listed in this article ensures that your soccer shoes last for a long time and that they maintain their appearance as long as you use them.